- Published on
How to add a React component using CMS data to your Webflow site
- Authors

- Name
- Shay Kennedy
Webflow is great for web design, but there are some UI requirements that just can't be done with the built-in Webflow tools. That's where React comes in handy!
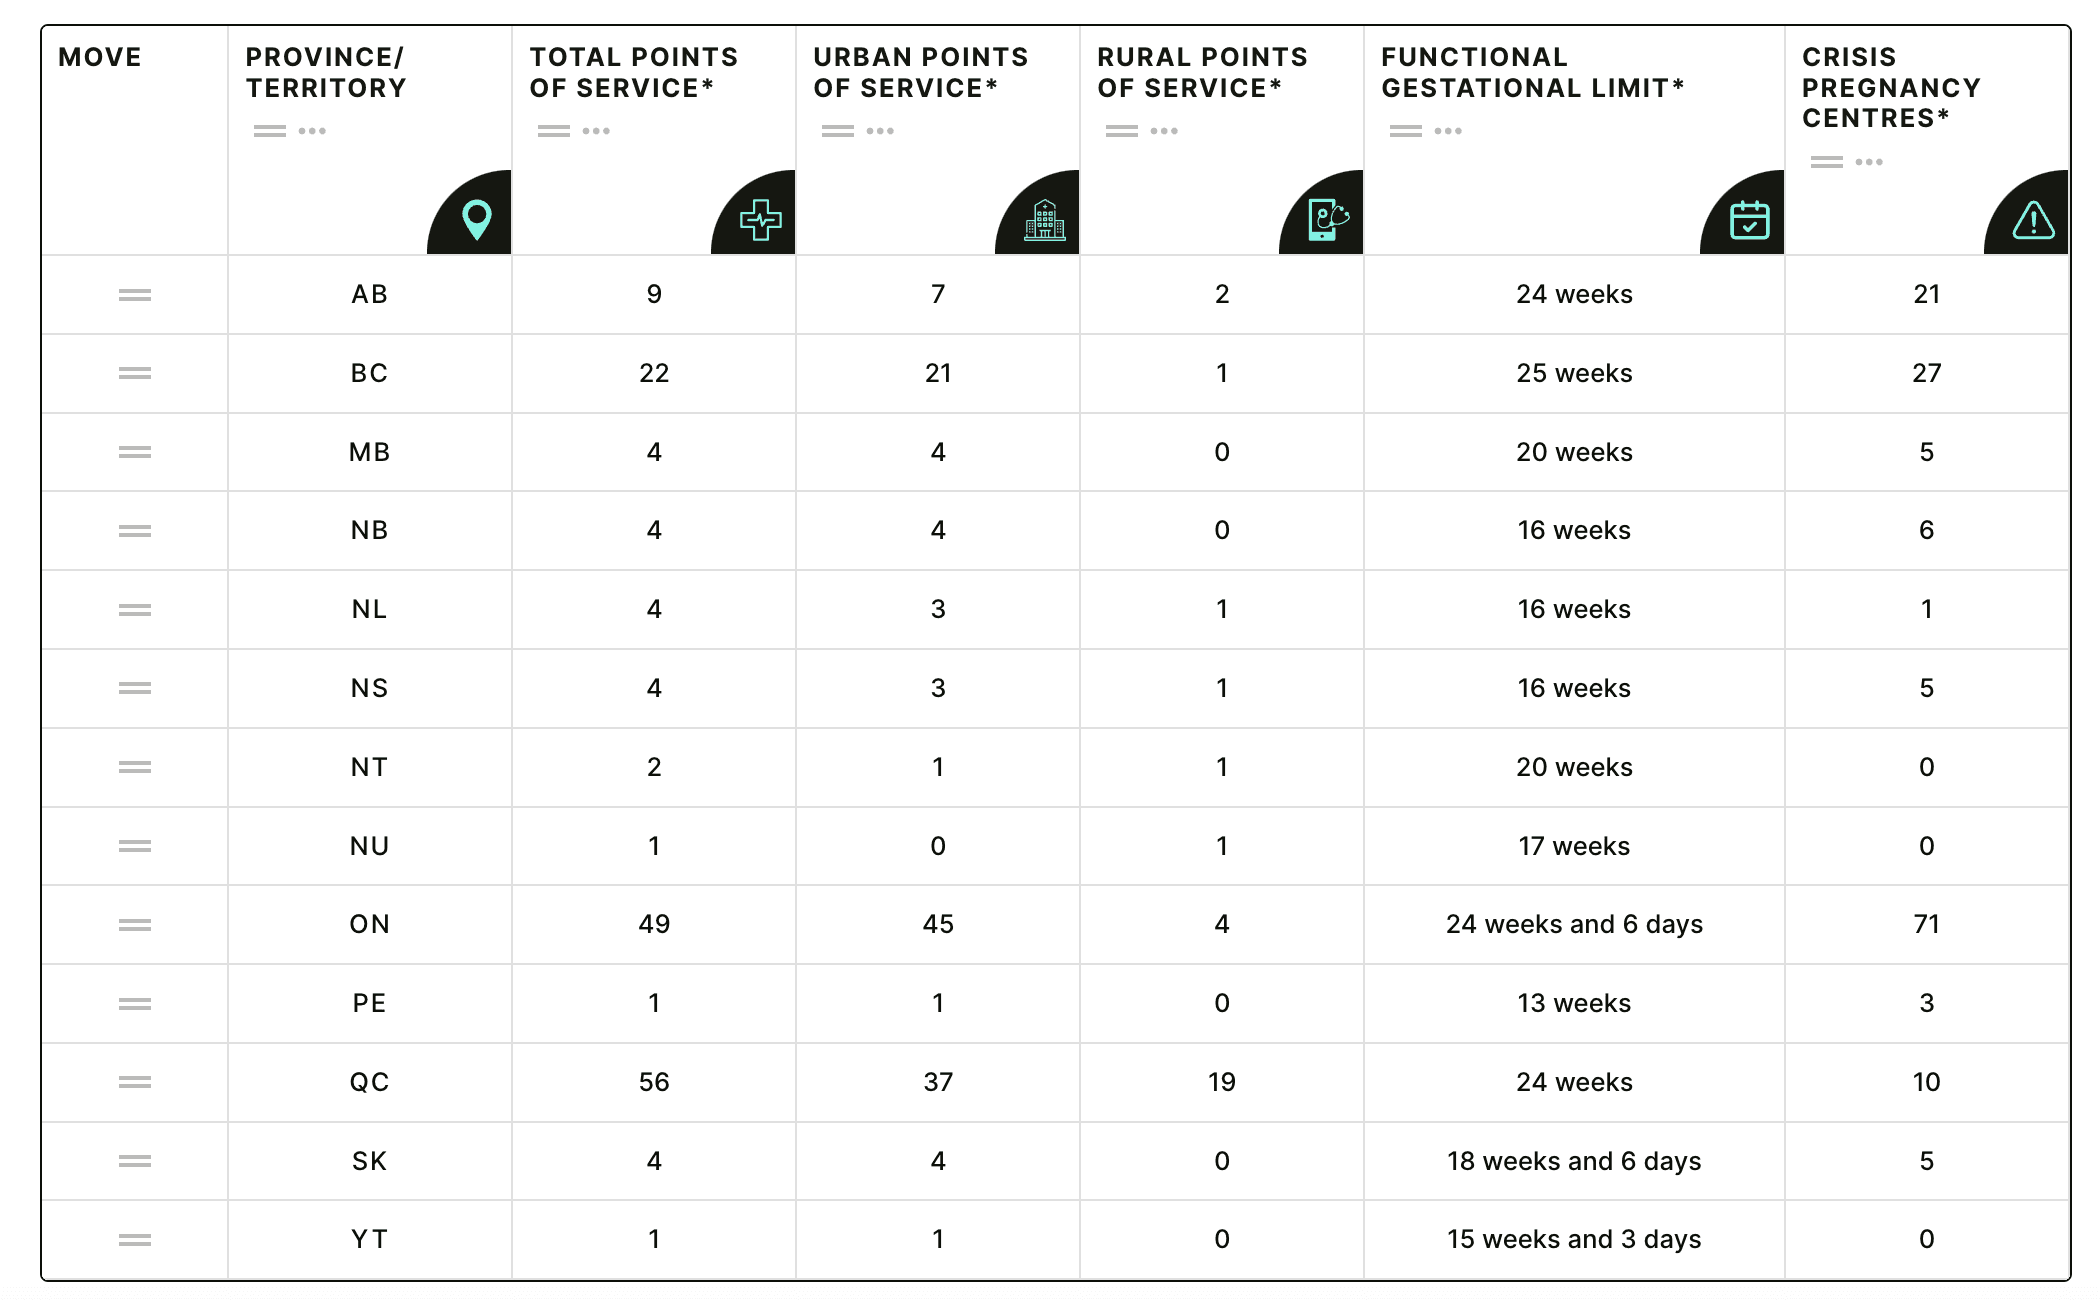
For one of my recent projects, the Abortion Access Tracker from LEAF and Action Canada, I needed to create an interactive data table. The clients wanted users to be able to filter and sort the data and reorder rows and columns. That's a bit more than what I could do with Webflow interactions, so I decided to turn to React.
I found an open-source React component called material-react-table that would meet the requirements, and all of the data was already in the Webflow CMS. Here's how I put it together!
Step 1: Create the React root element in Webflow with data attributes
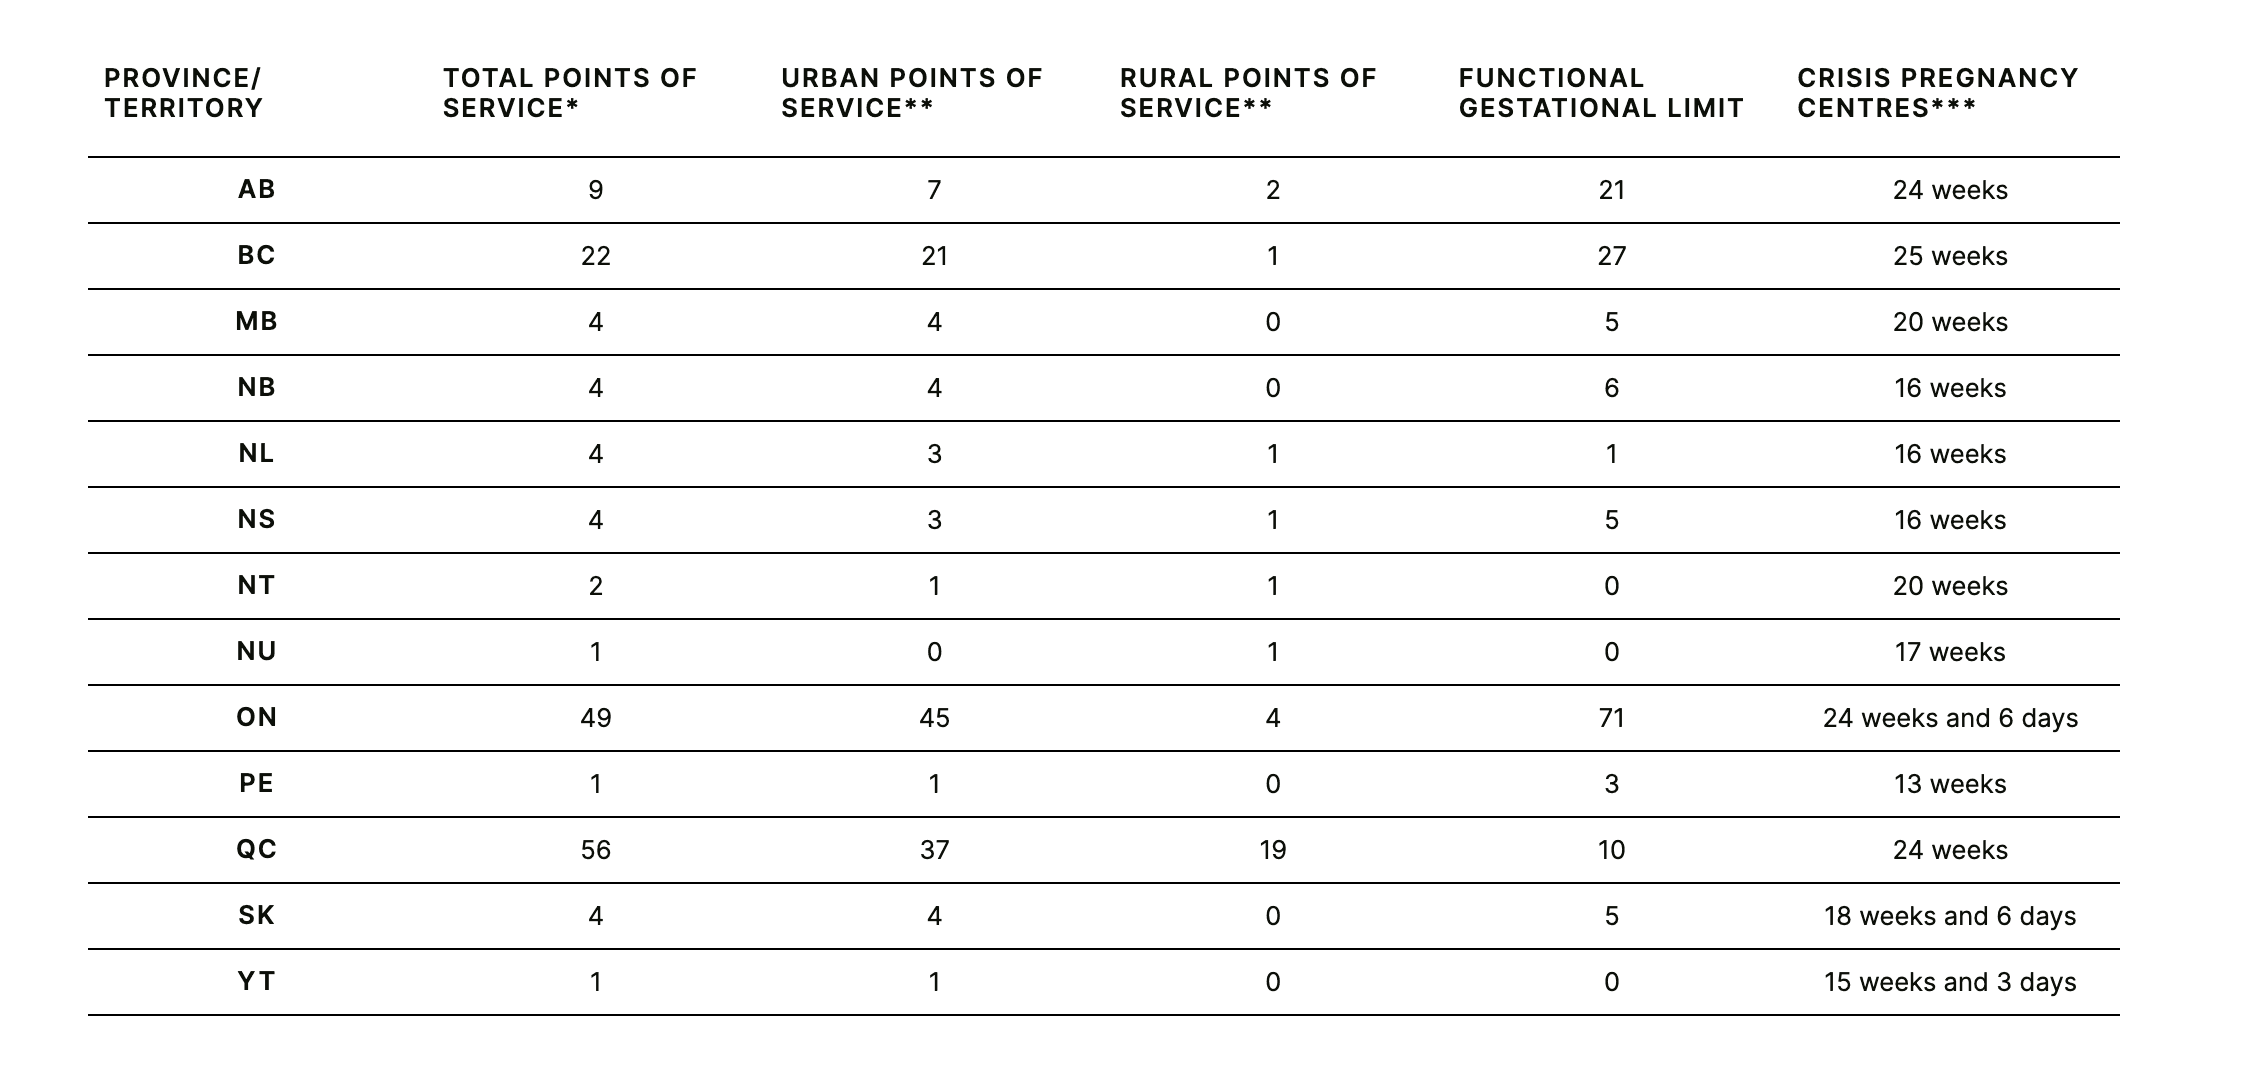
In Webflow I created a static table. The static table serves as a backup in case our script fails to load or execute. The parent element of the table has a unique ID, abortion-access-table, which we will use in our script to select the element and replace it with the React table.
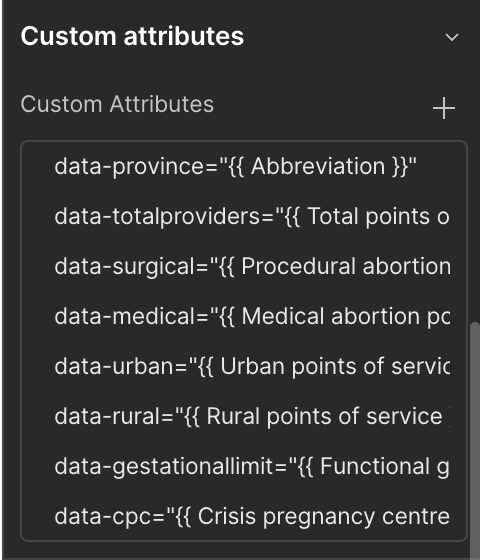
To generate the table rows, I'm using a CMS Collection List. Each row has custom attributes with the data I'll need from the CMS item:
Step 2: Initialize the React component and pass in the CMS data as props
In your script, initialize your component. This is in my index.js:
// select the table element
const rootEl = document.getElementById('abortion-access-table')

// select the row elements
const dataSource = document.querySelectorAll('#jurisdictions-list .jurisdiction-item')

// extract the CMS data from the custom attributes of the row elements
const tableData = [...dataSource].map(el => Object.assign({}, el.dataset))

const root = ReactDOM.createRoot(rootEl);

// pass in CMS data as props
root.render(
  <React.StrictMode>
    <App initData={tableData.length > 0 ? tableData : []} />
  </React.StrictMode>
);
I used create-react-app to bootstrap my component, yes I know it's deprecated, but I'm a creature of habit and it works for my needs in this case. Then I added my dependencies, most importantly the material-react-table that's doing the heavy lifting for me.
I also added a dist folder and a build command to copy in just the build files I'll need in Webflow.
Here's my package.json:
{
  "name": "abortion-access-table",
  "version": "1.1.0",
  "homepage": ".",
  "dependencies": {
    "@emotion/react": "^11.11.1",
    "@emotion/styled": "^11.11.0",
    "@mui/icons-material": "^5.14.13",
    "@mui/material": "^5.14.13",
    "@testing-library/jest-dom": "^5.17.0",
    "@testing-library/react": "^13.4.0",
    "@testing-library/user-event": "^13.5.0",
    "material-react-table": "^1.15.0",
    "react": "^18.2.0",
    "react-dom": "^18.2.0",
    "react-scripts": "5.0.1",
    "web-vitals": "^2.1.4"
  },
  "scripts": {
    "start": "react-scripts start",
    "build": "react-scripts build && cp build/static/js/main*.js dist/main.js && cp build/static/js/*chunk.js dist/chunk.js",
    "test": "react-scripts test",
    "eject": "react-scripts eject"
  },
  "eslintConfig": {
    "extends": [
      "react-app",
      "react-app/jest"
    ]
  },
  "browserslist": {
    "production": [
      ">0.2%",
      "not dead",
      "not op_mini all"
    ],
    "development": [
      "last 1 chrome version",
      "last 1 firefox version",
      "last 1 safari version"
    ]
  }
}
In my App.js component I import material-react-table and set up all my customizations and logic. The full code for my table component can be found on Github.
I develop the component locally using test data, then when it's ready to go I run npm run build to bundle it all up.
Step 3: Publish the component
You just need the chunk.js file and main.js file from the dist directory, so you can host them wherever you choose. I published it as a package on NPM and then used jsDelivr for the CDN.
npm version 1.0.0
npm publish
Step 4: Load the component scripts in Webflow
Thanks to create-react-app our component is already bundled up with all our dependencies so we just need to load them in Webflow. Go to the page you want the custom component on and open up the page settings, then scroll down to the Custom Code section, and add your script tags to the Before </body> section.
<script type="text/javascript" crossorigin src="/path/to/your/main.js"></script>
<script type="text/javascript" crossorigin src="/path/to/your/chunk.js"></script>
Now when you publish your site, you should see your custom React component using your CMS data from Webflow! Note that custom code doesn't run in the Designer or Preview, only on the published site.
I hope this is helpful for anyone wanting to get a custom React component on a Webflow site with CMS data, feel free to comment if you have questions or feedback!